Early Impressions of BM40RGB Ortholinear Keyboard
I finally received my BM40RGB keyboard that I’d ordered from KPRepublic on AliExpress.
EDIT: 2025-04: KPRepublic’s Violations of the QMK License
EDIT: 2025-04: I’ve noticed that kprepublic (which sells the BM40) has been put on QMK’s list of vendors violating the QMK’s license.
QMK’s code is licensed with GPL. GPL is a copyleft license. Basically, it’s a pro-social “I’m sharing this, but you have to share if you use it”. Or as it applies here: because these keyboard manufacturers are using QMK, they have to share the source code they used.
In the case of wired-only boards, it’s almost certainly the case that the code used to build the firmware is very basic & could be shared easily. (e.g. uploading the code to a git fork of QMK, or a zip file from a website).
KPRepublic, which distributes the BM40, doesn’t provide this. – The QMK docs note that support for KPRepublic’s boards has been provided by volunteers. (The QMK page also notes that new backwards-incompatible revisions of boards are released without notice, which then causes issues).
IMO, the whole point of buying a QMK-powered board is to be able to customise the firmware. Not having the source code practically limits that. (If it runs via, you could swap the keys around; but, you’d miss out on any new QMK features, or advanced uses).
Should you buy the BM40, or buy PCBs from KPRepublic?
I think if you have the understanding: you’re buying a cheap PCB, from a cheap
vendor which doesn’t provide customer service, and you’re on your own if
anything goes wrong.. then, sure.
– IMO, though: if you’re going to have to ask others for help,
you’re making others put in effort, which they wouldn’t have to if you’d
bought from a better vendor.
(FWIW, I’ve since designed cheap 4x12 ortholinear PCBs, with all the hardware design files & firmware source code available).
Quick Summary
it’s a relatively cheap, easy to assemble fancy keyboard,
it’s nicer to use compared to a typical keyboard for usecases where you could use the computer with both hands on the keyboard,
it took a bit of time to get used to.
- (The alphabetical keys were easy to get used to, since I had trained with ‘touch typing’ discipline to learn the Dvorak; but the symbols took some time to get used to).
Recommendation: - Nifty if you’re comfortable spending most of your time in tmux/vim or emacs, and would prefer a keyboard-focused experience. The reduced number of keys isn’t a hinderance. - If the grid-like arrangement of keys is still appealing, but you’d prefer to use it for mouse+keyboard activities like First Person Shooter games, then a larger ortholinear keyboard like an XD75 would be better.
Keyboard Overview
In case “self-assembled hot-swappable 40% ortholinear mechanical keyboard” is all opaque jargon:
A What Now?
The keyboard is a “40% ortholinear mechanical keyboard”.
The “mechanical” part refers to the key switches. They’re nicer to type with than more typical keyboard switches. (There’s a variety of mechanical key switches; loud/clicky is the most fun).
The “ortholinear” refers to the keys being aligned in a grid. Whereas
typical keyboards are “row-staggered”.
(Keyboards are now “row-staggered” because typewriters had to be,
and that’s what everyone is used to, I guess).
An iteration further is “columnar staggered” where the columns are
staggered to better suit how fingers are staggered.
The “40%” refers to approximately how many keys are on the keyboard compared to a full-sized 104-key keyboard. Keyboards with less keys isn’t limited to ortholinear boards. e.g. Razer recently released a 60% keyboard. – But, the most prominent ortholinear keyboards come from <olkb.com>. (With sizes: a “50%” named the Preonic, and a “40%” named the Planck).
Well. Clearly “custom mechanical keyboards” is a rabbit-hole of a hobby topic. But I’d still recommend looking into it for people who work with a keyboard all day. The main benefit to aim for would be a more ergonomic experience.
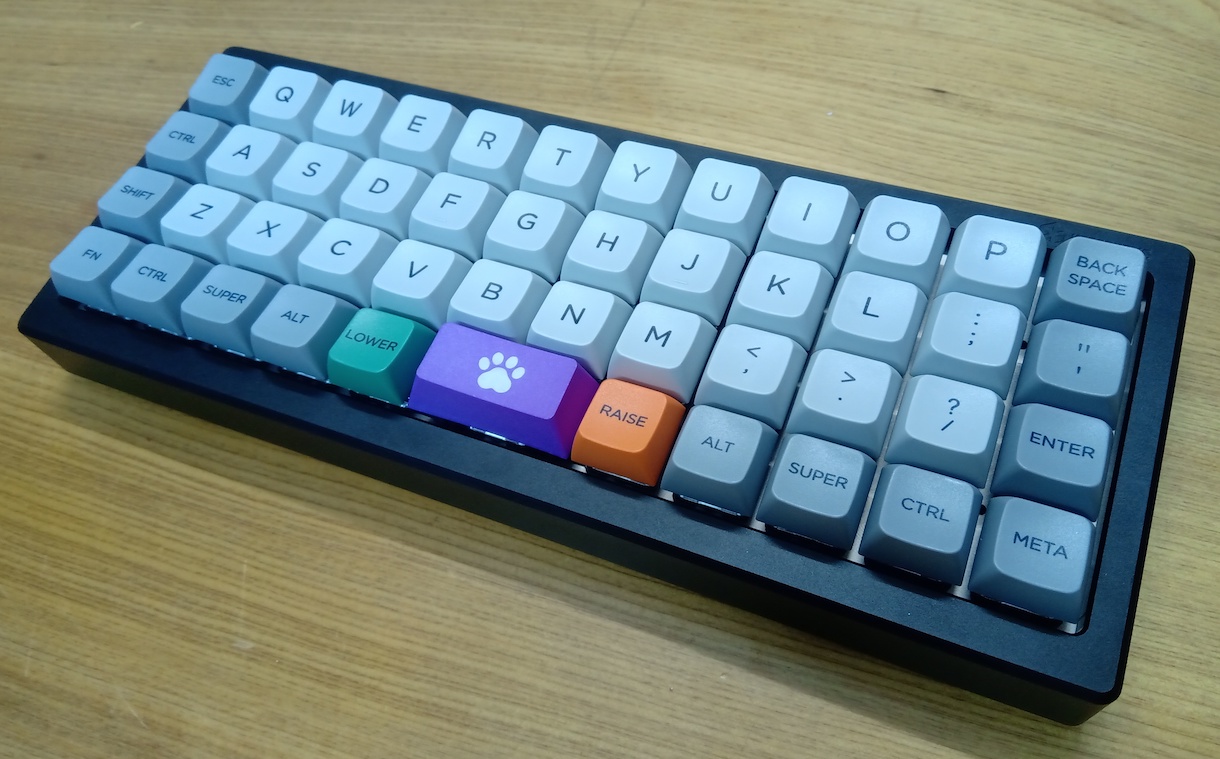
With my keyboard: The BM40RGB is the keyboard PCB.
To complete the keyboard, the PCB is mounted in a case, key switches
are connected to the PCB, and key caps are put on the key switches.
In the picture above, the case is a nice anodized aluminium case. The keycaps are the “big bang” key cap set from melgeek.com. The key switches are Gateron Brown.
Assembly
In terms of putting it together: Typically with assembling a keyboard
from a PCB, case, and switches, the switches require soldering to be
connected to the PCB. (In my limited experience: soldering itself isn’t
too hard. Desoldering can be harder. A cheap soldering iron will get the
job done, but is harder to use than nicer soldering irons for
inexperienced hobbyists).
The BM40RGB switches don’t require soldering, because the PCB has been
assembled with Kailh “hot swap” sockets. – I’ve seen comments that these
switches can be fragile, and that Mill-Max sockets are nicer. But these still
do the job of making keyboard assembly accessible.
Moreover, the BM40RGB is pretty blinged-out. Assembled on the PCB are
RGB LEDs underneath each switch, as well as underglow.
Necessary to have? No. Fun? Yes.
So. It was pretty easy to put together. A bit more difficult than putting Lego together, but not by that much.
Firmware
One other good thing about this BM40RGB PCB is that
QMK can be used as
the keyboard’s firmware.
This is useful because QMK can be used to customise not only the layout of
the keys, but also the functionality of the keyboard.
Examples of features I’ve found useful:
Support different “layers” for the keyboard. This almost goes without saying, since otherwise it really would be infeasible to use a keyboard with so few keys. Similar in usage to how pressing shift + ‘5’ result in a ‘%’, the different layers allow pressing the same physical key to output different key codes. e.g. the letter ‘t’, ‘5’, and ‘%’ can be produced from the same key.
Being able to switch the “capslock” key to “Escape key if tapped, Ctrl key if held”; and the “enter key” to “Enter key if tapped, Ctrl key if held”. (I’ve tried this with software like AutoHotKey, but the result from QMK is more reliable, and easier to customise like that).
Being able to switch the keyboard itself between QWERTY and Dvorak keyboard layouts. (QMK itself assumes that the OS is using a US keyboard layout).
Fancy RGB lighting effects. e.g. making a splash of colours as each key is pressed.
There are other features that sound neat, but that I haven’t tried yet. e.g. using a vim-style “leader key”, space-cadet style shift keys.
My Experience So Far With the Keyboard
In a sentence: I prefer using this keyboard for use cases where I don’t need to be using a mouse. That is, in cases where I can have both hands on the keyboard.
My Context/Background
That preference might need to be further qualified. With my typical usage and workflows, I can do a lot without having to use the mouse.
I’m happiest when in working in Emacs or tmux, and editing with vi keybindings.
As with many programmers, I never bothered learning ‘finger discipline’ for the QWERTY layout. i.e. each finger sticks to its own columns. On the other hand, I’m not sure anyone learns the Dvorak layout without using this ‘finger discipline’.
Things I Like About It
This keyboard saves so much on desk space compared to a full-sized keyboard.
It saves more than you’d think just by looking at the picture. Here’s the keyboard laid overtop of the full-sized Razer BlackWidow Ultimate 2016 keyboard:
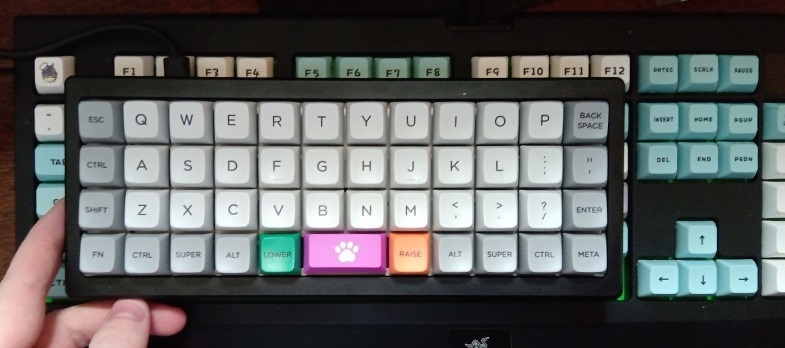
I haven’t yet tried using it with a laptop on a small table. e.g.
at a cafe. But, if I wanted to use a keyboard with a laptop like that,
I’d rather have a small keyboard like this.
– And the size does mean it’s convenient to carry in a bag.
In terms of typing speed:
- Using the ‘simple words’ test on 10fastfingers.com, using the Dvorak layout with a row-staggered
laptop keyboard, my
average was 83 WPM. Personal Best was around 90 WPM.
- That’s about what I get with the
BM40RGB. (Although when I
tried just now, I managed to score 100 WPM. So, it’s likely that it’s
easier to type Dvorak layout on an ortholinear keyboard).
- For the sake of transparency: using QWERTY layout with my Razer
BlackWidow, I could
average around 100 WPM, and my Personal Best was around 108 WPM.
- For a laugh I tried with QWERTY. – I got about 70 WPM. That’s partly from
not using QWERTY layout with this keyboard very much. But also
because with QWERTY my fingers physically know where the keys are
supposed to be; whereas with Dvorak my hands know which fingers to
use for each key.
So.
Typing speed for typing words isn’t really sacrificed if you drilled
with touch-typing exercises. (Typing speed for symbols is discussed later).
The bigger benefit to ortholinear is it’s much more comfortable than a
row-staggered layout. I’m willing to sacrifice some typing speed for
that. – I can still type on a normal row-staggered QWERTY keyboard;
but it feels so awkward to.
The symmetry of the ortholinear keyboard is so good.
The ortholinear layout makes it much easier to make use of the modifier
keys (alt, ctrl, shift, etc.) on the right hand side of the keyboard.
It’s not that I couldn’t make use of right-shift or right-ctrl etc.
when using a full-sized row-staggered keyboard.
– Row-staggered layouts have all sorts of different distances between keys.
(e.g. distance the pinky finger travels from home row to ctrl key is different
between left hand and right hand; distance from ‘f’ to ‘t’ is different than
from ‘j’ to ‘y’. etc.).
The RGB lighting effects are fun.
If you’re using this keyboard, you’re probably not looking down at the
keyboard when you type. That’s why the ‘ambient’ animation effects are cool.
Downsides, and things I don’t like:
Most of this applies to the 40% size, and some specifically to the BM40RGB PCB.
The downsides to ortholinear?
As noted above, if your fingers are used to row-staggered and
haven’t trained ‘finger discipline’, then it will be a clumsy
transition.
For custom keycaps, most keycap sets are for standard layouts of
keyboards. Ortholinear layouts like this all use “1 unit” keys.
Finding matching keycap sets is somewhat harder.
Downsides to the 40% size?
Yes, it is more difficult. (This also comes with a ‘bragging factor’, though).
Whereas the alphabetical characters are quick to pick up,
the symbols take much more time. After a week and a half of usage (and
some minor layout changes to improve consistency), I’m much quicker than I was;
but I still make more errors than I’d like.
If a keyboard should disappear, and be a transparent instrument between the user’s mind and what’s on the page: then, unfortunately, it takes quite a bit of time to get there with such a small keyboard.
I don’t think the reduced number of keys of a 4x12 ortholinear provides more than a marginal ergonomic benefit compared to a 5x12 ortholinear layout. And not enough of a benefit for the added difficulty.
A 40% layout is much harder to play PC games
that make full use of the number keys. (e.g. for tool belts like in Minecraft
or control groups like in Age of Empires).
I tried with Halo, and it seems ok at that, after rebinding the
controls. (Subject-to aforementioned clumsiness at being used to
row-staggered layouts for QWERTY).
My Razer Naga has long since broken on me, so I can’t say for sure if
that would mitigate it. This is literally the use case for that mouse, though.
There’s definitely a time-sink aspect to this, as with any hobby. I don’t find myself constantly re-customizing my keyboard layout. (I think some people do; but I don’t know if that’s because they use a wider range of software than I do, or because they use a narrower range of software).
Further Down the Rabbit Hole of this Hobby
Alternatives and Other Considerations
I love this keyboard. Other keyboards are nice, too.
What are the differences between this and the Planck PCB?
For one, the BM40RGB is available from KPRepublic.
This makes it more accessible for me than the mainly US/EU websites.
With such a niche hobby, often websites which sell custom
keyboard parts will be out of stock on certain parts.
e.g. the Planck PCB on olkb.com is
out of stock at the time of writing.
There are Planck PCBs plus cases available on
drop.com. (Drop grew
its brand as massdrop).
Also, ZSA Labs (who make the Ergodox EZ) also offer the Planck
EZ.
Other than availability, the Planck has other advantages e.g. it’s much more customizable. e.g. BM40RGB only supports one arrangement of keys, whereas the Planck PCB doesn’t require the small spacebar, and could have a full 48 keys. etc.
The BM40RGB PCB also didn’t require any soldering.
But if you’re fine with ordering a PCB
and doing soldering yourself, here are some projects I came across:
- ai03-2725’s Contra is a PCB which aims to be low cost to make.
- AcheronProject’s Shark PCB is a PCB which was designed because the cost to buy a Planck from drop.com would’ve been infeasibly high.
- Skip the PCB, and hand-wire the switches together in a plate.
- Or design the PCB yourself (whoa!).
- And BenRoe/awesome-mechanical-keyboard is a pretty long list of all sorts of fancy mechanical keyboards.
If ortholinear sounds good, but the 40% form-factor sounds to small, there are larger ortholinear keyboards. As far as I understand, several 75-key ortholinear keyboards will fit into most GH60-compatible cases. e.g. KPRepublic’s XD75